Saturday, April 30, 2011

Birthday Celebration Day 6 - Action Wobbles and Some Great News!

*****If you are looking for the Royal Wedding Blog Hop scroll down to the next post or click HERE*****

Hi and welcome to my 6th and final day of my birthday celebration week!!! I have loved having you celebrate with me. It has been so much fun! This post is going up just a little later than the other's this week and it is because I have some great news to share. I am so grateful and very excited to share with you that Emma (My Creative Time) has asked me to continue to be on her design team for another term. She is wonderful and amazing to work with and I'm blessed to know her. Thank you so much Emma! Click HERE if you want to know who else is on Emma's new design team.

Today I am spotlighting Action Wobbles! I was super lucky to be part of their 'focus group' last fall, thanks to my good friend Pam (Simply-Pam). I got to try these out before they were ever sold and I LOVE them. They definitely make for a fun and interactive card. They can be used on anything and be fun (like the card below), but I especially love to use them on things that might actually have that kind of movement, for example: a rocking horse, a fish, a kite in the air, a balloon, etc. Anyway, my point is I love them!


This card is pretty simple, but I definitely wanted it that way. It is for my nephew who is serving a Spanish speaking mission for my church. I think he will love the wobble cake and the super cute Spanish sentiment from Emma's Wow! So Many Candles stamp set.

GIVEAWAY! I am so happy to be able to offer a 25 count package of Action Wobbles to two different commenter's on this post!


Birthday Week RULES:

#1: Each day you will have up to three chances to enter for that day's prize. The first way is to simply make a comment on that day's post. You do not have to be a follower of my blog, but I would love it if you wanted to. The second and third ways will vary each day, but you will have to make a SEPARATE comment for each entry for it to count, if you group them all together it will only count as one entry for that day.

#2: If you win I will only be mailing to a US or Canadian address. I will be mailing out a lot of prizes next week and I need to keep the shipping costs reasonable, I hope you will understand.

#3: You must contact me to claim your prize. I will announce all the winners on Monday, May 2nd and you will have one week to contact me with your mailing information.

#4: All entries for the whole week will be combined together for a chance to win the Disney/Pixar Cars Cricut cartridge (pictured below).


Bonus Entry #1: 'Like' Action Wobble on FaceBook. Click HERE to go to their page. Then come back and leave me a comment telling me that you 'like' them. If you already like their FaceBook Page go ahead and leave me a comment telling me so.

Bonus Entry #2: How did you first hear about Action Wobbles? And what is the most creative way you have seen them used? Leave me a separate comment below with you answer.

I have a super short video of this birthday cake wobbling...


Okay, I think that is everything! Thanks SO much for visiting this week. I've had a lot of fun. Remember that you still have through Sunday night, May 1st to comment on any/all of the posts for this week. I will have the lucky winner's listed on Monday, May 2nd, 2011.

Items Used:

*Smiley Cards Cricut cartridge
*My Creative Time stamps - Wow! So Many Candles
*Peachy Keen Stamps - Happy Lashes
*Action Wobble
*Cappucchino twine from The Twinery
*Diamond Stickles
*DCWV- The Boy Stack - patterned paper
*Versamarker
*Chalk

Friday, April 29, 2011

Royal Wedding Blog Hop and Birthday Celebration Day 5 - Peachy Keen Stamps

Hello everyone and welcome to the Royal Wedding Blog Hop and the 5th day of my birthday celebration. If you came here by way of the creative and talented Angelica, then you are in the right place for the hop. If this has been your first stop on the hop please make sure that you take the time to go back and start at Heidi's blog.

Today I am spotlighting Peachy Keen Stamps. I LOVE my Peachy Keen Stamps SO much! They make EVERYTHING so much cuter. I could never say enough good about them. I just LOVE them.

For my project I made a ballerina princess birthday banner.

Here are some closeups and then the whole banner:


I wasn't sure if I was stretching the guidelines for the hop too much with my banner so I also made a wedding card for the occasion. I hope you like it. Aren't those Peachy Faces SO cute?! I LOVE them! I am also submitting my projects for the Whimsical Wednesday Challenge.


Giveaways: Peachy Keen Stamps has been so super generous and they donated some stamps for my birthday celebration. One lucky commenter will receive the Wide Eyed Kids 1 1/8 inch face assorment pictured below.


Another lucky commenter will receive the Happy Lashes 1 1/8 inch face assortment pictured below.

The rules remain the same for all posts this week. Your first entry is quite simply to make a comment on this post. Click HERE to link back to the first day's post and a full list of the rules.

Bonus Entry #1: "Follow" 'A Note From Kathy' on the Peachy Keen Blog. Kathy hasn't posted projects very often in the past but when she does they are absolutely AMAZING!!!! Click HERE to go to her blog. If you decide to follow her blog then come back and leave me a new comment telling me that you follow Kathy's blog. If you already follow Kathy's blog leave me a comment telling me so.

Bonus Entry #2: Leave me a comment telling me how you first heard about Peachy Keen Stamps and if you own any of their stamps I'd love it if you'd tell me which set you remember buying first.

Remember you have through Sunday night to leave a comment on any/all of my birthday posts for this week.

Alright, your next stop along the hop is the talented Theresa also known as The Scrapbooking Queen.

If you get lost along the way, here is the blog hop line up:

Heidi @ http://gotscraps.blogspot.com/
Viv @ http://craftinghaven.blogspot.com/
Lorie @ http://www.thethinkinspot.blogspot.com/
Janice @ http://stampingwithjanice.blogspot.com/
Samantha @ http://samanthacasey.blogspot.com/
Kim @ http://www.paperpunchaddiction.com/
Ruthie @ http://septemberninth.blogspot.com/
 
Items Used Banner:
 
*Sugar & Spice Cricut Lite cartridge
*Twinkle Toes Cricut cartridge
*Pooh Font Cricut cartridge
*Peachy Keen Stamps - Wide Eyed Kids
*Sakura White Gellyroll pen
*Adhesive pearls
 
Items Used Card:
 
*Sugar & Spice Cricut Lite cartridge
*Simply Charmed Cricut cartridge
*My Creative Time stamps - You Had Me at Chocolate
*Market Street Stamps - Vintage Wallpaper
*Peachy Keen Stamps - Wide Eyed Kids
*Glitter
*Sakura White Gellyroll pen
*Adhesive Pearls

Thursday, April 28, 2011

Throwback Thursday & Birthday Celebration Day 4 - My Creative Time

Hello and welcome to another fabulous Throwback Thursday at My Creative Time and the fourth day of my virtual birthday party. Today I am spotlighting My Creative Time. I have been SO SUPER blessed to be on Emma's very first design team. Can I say I have been on cloud 9 for the past 4 months! Emma is one of the sweetest people I know. Not to mention she is EXTREMELY creative and generous. I think she has made some of the MOST BEAUTIFUL sentiment stamps on the market. I seriously LOVE them to death. And she was super smart and has them manufactured by Peachy Keen Stamps, so they are of the utmost quality too.

For today's project we were asked to make a 3-D project and to use any Cricut cartridge that we wanted to use. For my project I made one of these cute baskets. I've seen a lot of them around and wanted to try one for a while.  I saw one just last week on Kristal Andrew's site (Getting Cricky) along with a simple photo tutorial and finally made one. It was super easy and I'm certain I will be making more of these. And The crepe paper ruffles were not an original idea. I have seen them on Kimberly's (My Craft Spot's) blog.


Here are a couple more angles:


Don't Emma's Polka Dot SURPRISE! stamps look beautiful with the polka dot paper? I LOVE this set!


And here is a view of a cupcake with a 'Mickey' on top.

Thanks for stopping by today. I hope that you will be able to join in on the Throwback Thursday Challenge. Make sure to check out Emma's post so you can see what she and the rest of her design team made for this challenge.

GIVEAWAYS! Emma was such a sweetheart and she has donated one of my FAVORITE stamp sets, Polka Dot SURPRISE! One lucky commenter will win this set.


I also have the stamp set 'WOW! So Many Candles' to give away to a different lucky commenter. I'm trying to spread out the goodies so as many people as possible have a chance to win something :).


The rules for this week remain the same, click HERE to go to the first Birthday Celebration post with the full list of rules.

For your first entry, simply make a comment on this post.

Bonus Entry #1: 'Follow' Emma's (My Creative Time's) blog. (Click HERE to go to Emma's blog). I'm pretty sure that almost all of you already follow her blog so this is a super easy entry. Just leave me another comment below telling me that you follow her blog.

Bonus Entry #2: Go to Emma's (My Creative Time's) shop by clicking HERE. In a comment below please tell me your favorite My Creative Time stamp set(s) and why you like that set so much. (examples: fonts used, sentiments, images etc).

Remember that you have all week to comment on any/all of my Birthday Party posts. I will be picking the winners Monday morning, May 2nd.

Thanks for joining in my party! What a fun week this is turning out to be!

Items Used:

*Sweet Treats Cricut cartridge
*My Creative Time - Polka Dot SURPRISE!
*Tim Holtz Distress Ink
*Glossy Accents
*DCWV patterned paper
*Red crepe paper
*Basic black ribbon

Wednesday, April 27, 2011

Birthday Celebration Day 3 - The Twinery

Hello and welcome to day three of my virtual birthday party. I'm having so much fun and I'm so excited about the awesome prizes some of you are going to win this week. Today I'm spotlighting The Twinery. I absolutely LOVE their baker's twine. Last fall I happened upon some baker's twine at a local scrapbooking store. They sold it, by the yard, in lots of different colors. I bought some to try out. While using the twine I discovered that there was one kind that I liked better than the rest. The colors were brighter it seemed and the twine was a little thicker or more plush. I found out that this twine was from The Twinery. I bought their sampler pack online and the rest is history.

I wanted to try something fun and different with the twine for my project today. I hope you like it :).


The Twinery has been so amazing and generous to work with. They have donated a Colorful Bunch Sampler Pack to one lucky commenter. This is 15 yards of each of their beautiful colors of baker's twine (a total of 165 yards of twine). Isn't it BEAUTIFUL?


The rules remain the same for each giveaway this week so if you need to check up on any of those details click on yesterday's link HERE.

Just make a comment under this post for your first entry and then there are two bonus entries too.

Bonus Entry #1: 'LIKE' The Twinery on FaceBook (click HERE to go to their page). Then come back and leave me a comment here saying that you did so. (If you already 'like' them simply state so in a comment below).

Bonus Entry #2: "Follow" The Twinery Blog (click HERE to go to their blog). Then come back and leave me a comment saying that you have. (If you already follow them simply state so in a comment below).

ALSO, just a reminder that you have all week through (Sunday May 1st) to make a comment on any/all of the posts for the week.

Here is an incredibly short video showing my 'rocking' horse. I can't have a rocking horse on a project without attaching it to an Action Wobble - LOL.


Items Used:

*Paper Doll Dress Up Cricut cartridge
*Maraschino twine from The Twinery
*Cappuccino twine from The Twinery
*My Creative Time stamps - Wow! So Many Candles
*Market Street Stamps - Perfectly Pretty Grid
*Peachy Keen Stamps - Rag Doll Faces
*Action Wobble
*Sakura White Gellyroll pen
*Adhesive pearls

Tuesday, April 26, 2011

Birthday Celebration Day 2 - Market Street Stamps

Hello everyone! Welcome to day 2 of my virtual birthday party. I'm SO excited because today I am spotlighting one of my favorite stamp companies, Market Street Stamps. These stamps are of amazing quality, they are manufactured by Peachy Keen Stamps, so they have the same beautiful Peachy color and quality. Angelica (co-owner and artist) has some beautiful, fun and trendy stamp sets and some amazing background stamps as well. The background stamps are HUGE (full A2 size) and they stamp beautifully. I LOVE them to pieces!!!! I think there is something perfect for every taste and style at Market Street Stamps so if you haven't heard of them before you definitely need to check them out.

For my card today I used one of Market Street Stamps background stamps called Loopy Loo Polka's. The image is also from Market Street Stamps and is called Robo Star. I paperpieced this cutie in turquoise and pink.


Market Street Stamps was SUPER generous and have donated two of their beautiful (A2 sized) background stamps. One lucky commenter will get the Loopy Loo Polka's background stamp.

And a different lucky commenter will get the Vintage Music Background Stamp.


Here is a reminder on the RULES for my birthday week:

#1: Each day you will have up to three chances to enter for that day's prize. The first way is to simply make a comment on that day's post. You do not have to be a follower of my blog, but I would love it if you wanted to. The second and third ways will vary each day, but you will have to make a SEPARATE comment for each entry for it to count, if you group them all together it will only count as one entry for that day.

#2: If you win I will only be mailing to a US or Canadian address. I will be mailing out a lot of prizes next week and I need to keep the shipping costs reasonable, I hope you will understand.

#3: You must contact me to claim your prize. I will announce all the winners on Monday, May 2nd and you will have one week to contact me with your mailing information.

#4: All entries for the whole week will be combined together for a chance to win the Disney/Pixar Cars Cricut cartridge pictured below.


Bonus Entry #1:  'LIKE' Market Street Stamps on FaceBook (click HERE to go to their page). Then come back and leave me a comment here saying that you did so. On their FaceBook page they notify you of stamp releases, special promotions, giveaways, and of course project inspiration. You definitely won't regret it. (If you already 'like' them simply state so in a comment below).

Bonus Entry #2: "Follow" Market Street Stamps Blog (click HERE to go to their blog). They have just started doing challenges, they have project inspiration and stamp release parties, speaking of which, they have a stamp release happening this very week!!! There are lots of chances to win some of their amazing stamps. I'm already in love with the new Paisley background stamp!! So what are you waiting for, go and follow their blog and then come back and leave me a comment saying that you have. (If you already follow them simply state so in a comment below).

Items Used:

*Market Street Stamps - Robo Star
*Market Street Stamps - Loopy Loo Polkas
*My Creative Time stamps - Wow! So Many Candles
*Pink Sorbet twine from The Twinery
* Caribbean Blue twine from the Twinery
*Crystal Stickles
*Glossy Accents
*Versamarker

Monday, April 25, 2011

Birthday Celebration Day 1 of 6 and Blog Hop Winner

Glora's Crafts Birthday Party April 25 to 30 Welcome to my virtual birthday party. I'm so excited to have you here and to share this fun week with you all. This week I am going to be sharing projects and giving away some of my favorite crafting products. I have contributed some of the prizes and I also have some AMAZING sponsors. I'm so thankful for them and their generosity. Each day I will 'spotlight' at least one of my favorite crafty things.

Today is all about the Cricut and the Cuttlebug.

One of my favorite embossing folders is called "Mickey Celebrates." Here is a super simple birthday card that I made with it.


For today's giveaway I have a 'Mickey Celebrates' Cuttlebug folders to give away to two random comments.


Here are the RULES for this week:

#1: Each day you will have up to three chances to enter for that day's prize. The first way is to simply make a comment on that day's post. You do not have to be a follower of my blog, but I would love it if you wanted to. The second and third ways will vary each day, but you will have to make a SEPARATE comment for each entry for it to count, if you group them all together it will only count as one entry for that day.

#2: If you win I will only be mailing to a US or Canadian address. I will be mailing out a lot of prizes next week and I need to keep the shipping costs reasonable, I hope you will understand.

#3: You must contact me to claim your prize. I will announce all the winners on Monday, May 2nd and you will have one week to contact me with your mailing information.

#4: All entries for the whole week will be combined together for a chance to win the Disney/Pixar Cars Cricut cartridge picture below.


Alright, I think that is just about everything. The bonus entries are VERY easy today.

Bonus Entry for Comment # 2 - What is your favorite Cricut cartridge?

Bonus Entry for Comment # 3 - Who is your favorite Disney character?

ALSO the winner of the Princess embossing folders from the Disney Easter Egg Blog Hop is...

Congratulations Kari, I will try and contact you later if you see this first send an e-mail with your mailing address to this e-mail: me(at)glorajean(dot)com


Items Used:

*My Creative Time Stamps - Wow! So Many Candles
*Cuttlebug embossing folder- Mickey Celebrates
*Charcoal twine from The Twinery
*White chalk ink

Saturday, April 23, 2011

Disney Easter Egg Hop

***If you are looking for the My Creative Time April Release Blog Hop click HERE or scroll down to the next post***

Well I'm so excited to have you along for this super fun Disney themed Easter blog hop. If you came here via Nicole (Creations By Mommy) then you are in the right spot. If not make sure to start at Monica's blog so you don't miss a bit of Disney themed inspiration and fun!

I have a couple of projects for you. The first is a small Disney Easter egg banner that I made and hung up at my parent's house.

Here is the whole banner and then a few close ups too:


Now for my second project. This is the Easter card that I made for my parents. It is a egg shaped card with a little Disney fun added to it.


That darling sentiment is from Emma's (My Creative Time's) Color Me Happy stamp set. Isn't it BEAUTIFUL?! It was the perfect touch for the card.

Well thanks for hopping by. For blog candy I'm offering a Cuttlebug Princess embossing folder set. All you need to do is leave a comment and have a US or Canada mailing address. I would love you to follow my blog if you like what you see, but it is not required to win. I will select a random winner on Monday, April 25th, 2011.
Your next stop is Janis of Pause, Dream, Enjoy.

Here is the hop order in case you get lost along the way:

Sandra: http://365daysofcricut.blogspot.com/
Elsa: http://www.cricutlvr.blogspot.com/
Carley: http://the-real-icarley.blogspot.com/
Norma: http://pinkblingcrafter.blogspot.com/
DD's Crafts: http://craftydeb-ddscrafts.blogspot.com/
Nicole: http://www.creationsbymommy.com/
Glora: http://glorascrafts.blogspot.com/ (YOU ARE HERE)
Janis: http://pausedreamenjoy.blogspot.com/
Lauren: http://laurenscreative.blogspot.com/
Melissa: http://disneydreamerdesigns.blogspot.com/
Scraps to Treasure: http://scraps2treasure.blogspot.com/
Theresa: http://www.thescrapbookingqueen.com/
Olga: http://www.threebutterflykisses.com/

Items Used Banner:

*Easter 2010 Cricut cartridge
*Mickey Font Cricut cartridge
*Alphalicious Cricut cartridge
*Blossum twine from The Twinery
*Mickey icon stamp by EK Success

Items Used Card:

*Easter 2010 Cricut cartridge
*Mickey font Cricut cartridge
*Sweet Treats Cricut cartridge
*Gypsy
*My Creative Time stamps - Color Me Happy
*Lilac twine from The Twinery
*Core'dinations cardstock

Friday, April 22, 2011

My Creative Time's April Release Blog Hop

Good morning and welcome to another fun My Creative Time stamp release and blog hop. If you came here via the talented and sweet Katie's blog (Crafting With Katie) then you are in the right spot, if not make sure you start back at Emma's blog for a whole lot of inspiration and a look at some BEAUTIFUL new stamp sets. These sets are available for purchase NOW, so click HERE and check them out!

Emma asked me to use her new set called "Follow Your Dreams." This set is AWESOME! I absolutely love the cute images and the perfect sentiments. I made my cards with my nephew in mind. He is graduating from high school this year and these are his school colors. The banner is from a different one of Emma's sets called 'My One and Only' but the rest of the stamped sentiment is from 'Follow Your Dreams' even that ADORABLE little diploma he is holding is from that set.


I had such fun playing with the stamps that I ended up making another card in his school colors. Now I will have to decide which one fits my nephews style the best.


Thanks for dropping by and make sure you hop along to every stop along the way and make a comment so that you can be entered into the drawing for Emma's adorable little bonus stamp. She is giving one away at each blog stop. Isn't she the sweetest?! You have until Sunday morning, April 24th, to comment and be eligible for the bonus stamp.

You next stop is the talented Leanne.

Here is the line up in case you get lost along the way:

Nikki http://scrappinnavywife.blogspot.com/
Abby http://www.scrapbookaholicbyabby.com/
Linda http://www.krazyquilling.com/
Katie http://www.craftingwithkatie.com/
Glora http://glorascrafts.blogspot.com/
Leanne http://createdbyleanne.blogspot.com/
Vicky http://luvmygypsy.blogspot.com/
Tanner http://www.mrcricutcrazy.com/
 
Items Used:
 
*Everyday Paper Doll Cricut cartridge
*My Creative Time stamps - Follow Your Dreams
*My Creative Time stamps - My One and Only
*Peachy Keen Stamps - Simple Simons
*Congratulations Cuttlebug embossing folder
*Core'dinations gold pearl paper
*Glossy Accents
*Sakura White Gellyroll pen
*Versamarker

Thursday, April 21, 2011

A Sweet Easter Message

I don't have a crafty project for you today, but I wanted to share a short but powerful video on the true meaning of Easter. I am so thankful for my Savior and Reedember. I hope you enjoy the video. Much love and hugs and a very Happy Easter to you all - Glora


Double-click the video to play it full screen, or click here to watch it directly on YouTube.

Wednesday, April 20, 2011

Bunny Hugs Card and Picture Tutorial

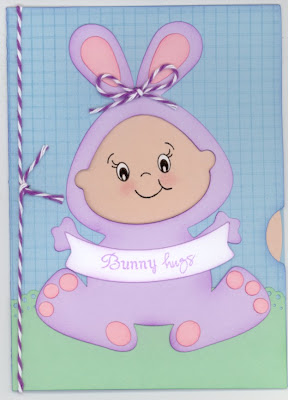
I've had several requests on how I made my two Peachy Keen face spinner cards, Turn that Frown Upside Down and Lucky to Have a Friend Like You. My original spinner card was inspired by an ADORABLE astronaut card that Nikki (Scrappin' Navy Wife) had made. I loved her card it blew me out of the water and got the wheels in my head turning and I went from there. Below is the card I'm going to show you how to make today. WARNING: This is a VERY long post!!!


I'm not ready for a video tutorial yet so I've tried to work up a picture tutorial for you all. I hope it makes sense and I hope you enjoy it. This is definitely not the only way to do this, it is just the way I do it. Do whatever works best for you and have fun. For my version of this card you will need either Design Studio or a Gypsy. Alright here we go.

Step 1: Add the card from the Wild Card cartridge. It looks like the image below.


Step 2: Flip the image (or rotate it 180 degrees).


Step 3: Hide all of the circles except for the little one right above the biggest one (this is where your brad comes through so your card can spin)


Step 4: Grab the image you are wanting to use. For these kinds I use images where there is a 'face shape' in the cut somewhere. For example this bunny below has a dashed line around his face that is because there is a 'face shaped' cut that would normally be layered on top of this.

Placement of the bunny is very important because 1: you need to have enough space under the face area for a small brad to move around without being seen. And 2: you also want to make sure this is where you will want the image when the card is put together because everything will need to line up perfectly with the little window or peek hole that the face cut makes.


Step 5: Grab the coordinating face shape (like the one to the right in the picture below). Then line it up with where it would belong on the bunny. Group the bunny and the face shape together so that when you move them away later they will stay together.


Step 6: Copy another face cut and line it up perfectly with the previous cut. You want this face shape to be 'grouped' with your card base and NOT with the bunny. Now you want to move the bunny away but leave the other face there. We want this to cut out because this is the peek hole for your card.


Step 7: Now you will want to lay all of the other coordinating pieces for the spinner card and bunny out on your mat how you would like them to cut.


Alright, how are we doing? Is everything about as clear as mud. I hope that the pictures are helping a little. Now we will continue on with the actual cutting and assembling.

Step 8: Place your paper on your mat and cut it with your Cricut. I like to get everything cut at the same time if I can. Here is what my mat looked like before cutting:


and here are all the pieces for my card after it was cut:


I did make one extra cut because I wanted to show you the difference between 'our' special bunny and the one that would normally cut.


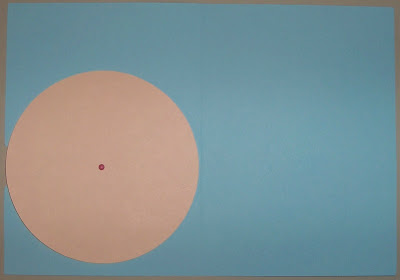
Step 9: Score and fold the card in half, then add the circle liner to the inside with a brad. (Side note: I like to add the brad pretty side up on the inside because the part on the outside of the card will just be covered up in the end - I think this makes it look nicer).

This is what the inside looks like:


And here is what the front looks like:


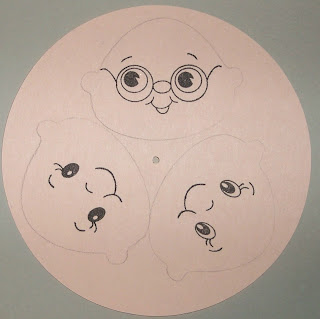
Step 10: Lightly trace around the face shape with pencil as many times as it will fit (make sure it is light because you will want to erase it later). After tracing the face shape on the skin colored spinner remove the brad and set aside for later.


Step 11: Stamp the faces you want to use.


Step 12: Erase the pencil tracings and color in the eye whites and then add rosy cheeks.


Now the liner is all ready to go. Now lets work on the rest of the card.

Step 13: Ink the insides of the peek hole the same color as the top cut, in this case purple. You want to do this because you don't want the blue to show through when you put it together. Believe me this step makes a world of difference in the finished product. I inked around the whole bunny while I was at it.


Step 14: Assemble your bunny and decorate your card base (just make sure that you don't cover up any part of your window).

Here are my three main pieces ready for assembly:


Step 15: THIS STEP is VERY important. Make sure to attach the peach colored liner to the inside of the card with your brad again. It is important to add the liner before you attach the bunny because the bunny is supposed to cover up or 'hide' the brad. This is how your card will look now (kinda funny I know but it will look awesome after the next step).


Step 16: Adhere your bunny to the front of the card and voila you have a super cute and fun card that you won't want to stop spinning!

Here are pictures of each of the faces for this bunny...


Thanks for following along this super long picture tutorial. If you end up making one of these make sure to let me know so I can come and take a look. Have fun! Huge BUNNY HUGS - Glora

Items Used:

Simply Charmed Cricut cartridge
Wild Card Cricut cartridge
My Creative Time stamps - Color Me Happy
Peachy Keen Stamps - Critter Faces Large
Market Street Stamps - Perfectly Pretty Grid
Lilac twine from The Twinery
Martha Stewart Doiley punch
Inks for inking
Sakura White Gellyroll pen
Chalk
>