Hello My Creative Time friends. We are already at sneak peek #3. Can you believe it? Today we are going to showcase the new set called XL Label Borders. This set is AWESOME! You know that beautiful XL Label Die, well this set gives you four more beautiful border options to use with it. The Whimsical Calendar Days set gave you one border for this die and this set gives you four more options. I've made either a small shape card or a gift tag using each of these new borders. There are also a hand full of other sentiment stamps that work really well for little gift tags or cards.
This one was a single line outline border. The sentiment is from the You're My Best Buddy stamp set. And the awesome Santa coat is from the All Around Accessories set.
For this gift tag, I used the single line border stamp in addition to a beautiful snow flake border stamp. I heat embossed the snowflakes with a pretty embossing tinsel. The snowman is also from the All Around Accessories set.
Here is the back of one of the tags so you can see the To: and From: stamps that also come with the XL Label Border stamp set.
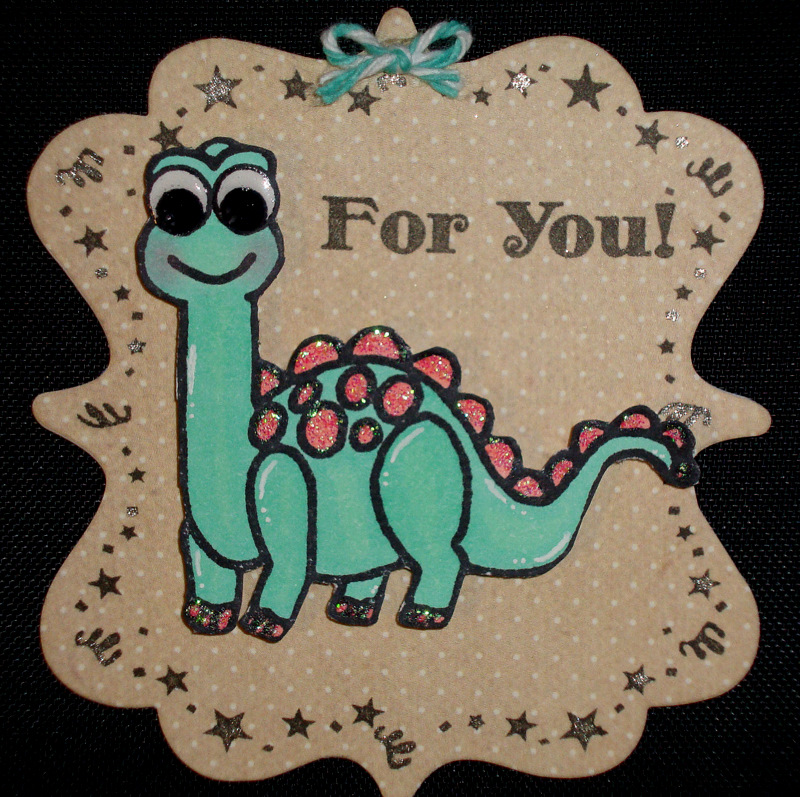
This one is a mini shape card made with the XL Label Die. I've done a tutorial on this type of card before and will leave a link to it for you. I used the darling confetti border. This border is so cute. I accented some of the confetti pieces with a glitter gel pen. The For You! sentiment is from this XL Label Border stamp set and the darling little dinosaur is from the All Around Accessories stamp set.
And here is the last one...
Yes, that is right a perfectly stitched border. I seriously LOVE these fun border for the XL Label Die. These give you so many options for this die. And as far as the die goes, I can't say enough good about it. I've found that this die works beautifully for: gift tags, mini-cards, accents to a regular card, scrapbooking (journaling tag or embellishment) and I've even used it to make a banner! I LOVE this die and so I really love the extra options on dressing it up.
Here is a picture of this same mini-card showing what it looks like opened up (on the left) and what it looks like closed up (on the right). It is the perfect size for a little note accompanying a present.
If you don't know how to make a shape card out of a die, you can click HERE and it will direct you to a post I have with a short video that demonstrates making shape cards out of dies.
Sorry this post was so long but I just had to try out all of the border options and thought that you might want to see all of them as well.
Sneak Peek Giveaway Time!
Listen up "My Creative Time" friends! We are giving all of you an opportunity to win some AWESOME prizes during Sneak peek week with a total of "6" winners to be announced during Friday's Stamp release! All you have to do is leave a comment HERE along w/the rest on the design teams blogs for a chance! These are prizes you do NOT want to miss out on!!
1. SPREAD THE WORD TO THE WORLD ON FACEBOOK about this release & whatever connections you may have! Let us know on "My Creative Time's" FB page here: http://www.facebook.com/#!/pages/My-Creative-Time/364568506334 that you did so! OR you can just tag me in your post!
2. Just comment on ALL of the designers blogs EVERYDAY during Sneaky Peek week! THAT's ALL you have to do to qualify for the giveaways!;)
All winners will "randomly" get chosen and Emma will announce all six winners on Friday, October 21st @ 12am pst in her video during the release & blog hop of this AMAZING new stamp collection! GOOD LUCK! Log onto to your facebook now & let start spreading word!;)
Thanks for stopping by today. I can't wait to see what Emma and the rest of the design team came up with! Have a wonderful day! Hugs- Glora
Items Used:
My Creative Time stamps - XL Label Borders
My Creative Time stamps - All Around Accessories
My Creative Time stamps - You're My Best Buddy
My Creative Time stamps - Anyday Crossword and Bingo
My Creative Time Dies - XL Label Die
Copic Markers
Stickles
Glossy Accents
Sakura Gellyroll Pen
Glitter Gel Pen
Twine from The Twinery
Eyelets
Snow Writer
Glitter
Wednesday, October 19, 2011
Tuesday, October 18, 2011
MCT October Stamp Release Sneak #2
Hello friends and welcome to day 2 of My Creative Time's 11th stamp release. Today we are all using a set called All Around Accessories. These are some awesome larger sized image stamps that fit beautifully inside the XL Label Die but they can used separately as well.
Here is just a little bit of a close up since the details are hard to see on a long card, I used the All Around Accessories (for the awesome chocolate truffles with a candle on top), the XL Label Die, and the Whimsical Calendar Days:
Sneak Peek Giveaway Time!
Listen up "My Creative Time" friends! We are giving all of you an opportunity to win some AWESOME prizes during Sneak peek week with a total of "6" winners to be announced during Friday's Stamp release! All you have to do is leave a comment HERE along w/the rest on the design teams blogs for a chance! These are prizes you do NOT want to miss out on!!
1. SPREAD THE WORD TO THE WORLD ON FACEBOOK about this release & whatever connections you may have! Let us know on "My Creative Time's" FB page here: http://www.facebook.com/#!/pages/My-Creative-Time/364568506334 that you did so! OR you can just tag Emma in your post!
2. Just comment on ALL of the designers blogs EVERYDAY during Sneaky Peek week! THAT's ALL you have to do to qualify for the giveaways!;)
All winners will "randomly" get chosen and Emma will announce all six winners on Friday, October 21st @ 12am pst in her video during the release & blog hop of this AMAZING new stamp collection! GOOD LUCK! Log onto to your facebook now & let start spreading word!;)
Okay I think that is it for today. I'm so excited to see what Emma and all of my amazingly talented design team sisters came up with. Have a wonderful day! Hugs- Glora
Items Used:
*My Creative Time Stamps - All Around Accessories
*My Creative Time stamps - Whimsical Calendar Days
*My Creative Time Dies - XL Label Die
*Copic Markers
*Patterned paper - DCWV: Nana's Nursery
*Stickles
*Sakura White Gellyroll Pen
*Ribbon
Monday, October 17, 2011
Tanner Turkey is a Cutie
If you are looking for the My Creative Time Sneak Peek #1 scroll down or click HERE.
I made this card using the current Peachy Keen Challenge sketch. And I just had to use the darling Tanner Turkey from the newest Peachy Keen release. I was lucky enough to win him and LOVE him so much. If I wouldn't have won him I definitely would have bought him!!! This little cutie was drawn by the sweet and talented Lorie Souther of (The Thinkin' Spot). If you haven't seen the new stamps she drew you definitely need to stop by the Peachy Keen store and take a look.
I tried something a little different when I colored him up. I started with some high quality kraft cardstock as my coloring base. I kind of like how the fibers on the kraft cardstock show through. It was a fun experiment. I also colored him up like I would have in grade school. We always used bright colors on the tail feathers so red, orange and yellow it was. Oh yes and he is also on an Action Wobble and looks SO cute wobbling around.
I hope to see you tomorrow for another sneak peek from My Creative Time's 11th stamp release. Hugs- Glora
Items Used:
Peachy Keen Stamps - Country Bumpkin stamps- Tanner Turkey
Action Wobble
BoBunny Double Dot paper
Copics
Glossy Accents
Sakura White Gellyroll
MCT October Stamp Release Sneak #1
Hello My Creative Time friends. It is time for another release week at My Creative Time. Today we are showcasing a set called Cherish This Moment. This set has a REALLY nice sized font and terrific sentiments. It is SO perfect for scrapbooking but terrific for cards as well. Today's project is an autumn layout (you can click on the pictures if you want to see the details better).
Here is a closeup of the top title section:
The 'life is beautiful' and the 'cherish this moment' stamps are both on this set. I cut the autumn word art out from the Stretch You Imagination Cricut cartridge. I stamped the acorn with a Simple Sally face from Peachy Keen Stamps and added some faux stitching with my gel pen.
I just had to show a closeup of that sweet little leaf. The darling face is from the Princess Face Assortment by Peachy Keen Stamps.
And another fun thing I wanted to show you was my 'hidden' journaling tag. Do you notice the curvy yellow piece to the side of this photo mat? Well it is a hidden journaling tag that I made with Emma's XL Label Die.
All I have to do is pull the tab and I can remove it and read the journaling for this page (which has not been completed yet, I will do that when I add the pictures)...
Did you notice those beautiful and perfect journaling lines (I so need those because I can not write straight without them)? Well those beautiful journaling lines that fit perfectly on Emma's XL Label Die are included in this new Cherish This Moment stamp set. So fun! I hope you enjoyed todays project.
Sneak Peek Giveaway Time!
Listen up "My Creative Time" friends! We are giving all of you an opportunity to win some AWESOME prizes during Sneak peek week with a total of "6" winners to be announced during Friday's Stamp release! All you have to do is leave a comment HERE along w/the rest on the design teams blogs for a chance! These are prizes you do NOT want to miss out on!!
1. SPREAD THE WORD TO THE WORLD ON FACEBOOK about this release & whatever connections you may have! Let us know on "My Creative Time's" FB page here that you did so! OR you can just tag me in your post!
2. Just comment on ALL of the designers blogs EVERYDAY during Sneaky Peek week! THAT's ALL you have to do to qualify for the giveaways!;)
All winners will "randomly" get chosen and Emma will announce all six winners on Friday, October 21st @ 12am pst in her video during the release & blog hop of this AMAZING new stamp collection! GOOD LUCK! Log onto to your facebook now & let start spreading word!;)
Alright that's a wrap for today. Make sure that you stop by Emma's blog to see what she and the rest of my SUPER talented design team sisters have made. Have a wonderful day! Hugs- Glora
Items Used:
*Stretch Your Imagination Cricut cartridge
*My Creative Time stamps: Cherish This Moment
*My Creative Time Dies: XL Label
*Peachy Keen Stamps: Princess Faces
*Peachy Keen Stamps: Simple Sallies
*Versamarker
*Tim Holtz Distress Inks
*Sakura White Gellyroll Pen
*Zig Writer
*Raffia
Sunday, October 16, 2011
D. H. Scrubby's Tech Tips: Using an RSS Feed
Glora's husband fancies himself a writer and a technology enthusiast (code for "likes expensive toys"). As a guest writer for Glora's Crafts, he writes articles which might be interesting to the crafting and blogging community.
3.In the New RSS Feed dialog box, type the URL of the RSS Feed. For example:
To begin following a new feed, select the Feed button from the toolbar.
"So many blogs! So little time!" cried Glora, as she explained that she wanted to "follow" more blogs, yet clicking another Google Friend Connect "Join This Site" button was going to overload Google's Reading List and overwhelm her ability to catch up on everyone - especially on her most favorite sites.
The technology solution: Use a Really Simple Syndication (RSS) feed reader.
"Syndication" means the distribution of content, and "Really Simple" describes the way we want it! As new content is posted to a blog, behind-the-scenes a file (known as an RSS file) is updated. By pointing a RSS reader software to this file, it can scan the pages for you. When something new shows up, you are alerted in a way similar to receiving a new email in your inbox.
Our solution was to go ahead and publicly follow as many sites as she wanted. Blogger / Google's reading list would no longer be as relevant, because her feed reader would contain the updates she was most interested in seeing.
To make this work, you will need to know the secret RSS link for each blog.
Helpful hint: Almost all Blogger sites simply add this code to the end of the site address: /rss.xml
For example, the RSS feed for http://glorascrafts.blogspot.com is http://glorascrafts.blogspot.com/rss.xml
Helpful hint: Almost all Blogger sites simply add this code to the end of the site address: /rss.xml
For example, the RSS feed for http://glorascrafts.blogspot.com is http://glorascrafts.blogspot.com/rss.xml
Bonus Computer Jargon Hint: Because computer people like to come up with new words, RSS Readers are also known as "Feed Aggregators."
Since the vast majority of Glora's Crafts readers use Microsoft Windows based systems, I will offer two Windows-based solutions.
Microsoft Office Outlook (http://office.microsoft.com/en-us/outlook/)
- If you already own a license for Microsoft Outlook, then it can do the job. If you don't own Microsoft Outlook, do not rush out and buy it only for this purpose! Skip down to Windows Live Mail for a free solution.
Step 1 for Microsoft Outlook 2007: Click the Tools menu. Select Account Settings.
Step 1 for Microsoft Outlook 2010:
Click the File tab. Click Account Settings, and then select Account Settings.
The remaining steps apply to both versions.
2.On the RSS Feeds tab, click New
3.In the New RSS Feed dialog box, type the URL of the RSS Feed. For example:
http://simply-pam.blogspot.com/rss.xml
5.Click OK.
Windows Live Mail (http://explore.live.com/windows-live-mail)
- This program is free when you register for a Hotmail or Windows Live email account. (bonus tip: if you are using Microsoft Outlook Express, you really owe it to yourself to upgrade to this little beauty!)
When you start up Windows Live Mail, it will default to the Mail portion of the program.
In the lower-left corner, click Feeds.
To begin following a new feed, select the Feed button from the toolbar.
Enter the RSS feed address for the blog you want to follow. For example: http://glorascrafts.blogspot.com/rss.xml
Click OK.
Just like that, your reader grabs the most recent posts. You may read them in the same way that you would an email.
Add a few more of your favorite blogs. For example:
http://glorascrafts.blogspot.com/rss.xml
http://simply-pam.blogspot.com/rss.xml
http://simply-crafts.blogspot.com/rss.xml
These are the two programs that I have tried. If you don't like Microsoft, don't have a compatible version of Windows or Outlook, or just want to try something different, here is a list of additional programs to consider:
Comments are always welcome - especially other tips, tricks, or recommendations of aggregators that work well for you. However, please know that I cannot provide technical support for your situation. If you run into trouble, seek out professional assistance (that is, invite the neighborhood nerd over and offer him a doughnut).
Saturday, October 15, 2011
The Sweetest Halloween Pumpkin EVER!!!
Hello sweet crafting friends. Today I'm going to share a couple of cards that I made with some digi images that my friend Cindy of Cindy's Little Creations made. Cindy is super talented and I'm so proud of her and the beautiful designs that she has been making. Cindy had shared some images for me to use and I love them!!! Stop by HERE to see other creations that Cindy has made. You will not be disappointed she is amazing!
Now, I really am a novice at coloring with Copics but have some and I love how they look so I used them anyway (although I will admit that it took me FOREVER to do up these two images). I only have 36 markers that came in a set and I have actually found that it makes for some difficulty in blending since the colors are not as close in color as I would like, but for now they work. Don't pay too close of attention to my coloring, just enjoy the beautiful digi's for what they are :). I would also like to thank my friend Kate for some tips on working with digi's and Cindy gave me some awesome pointers too. Thanks ladies!
Here is my first card and I'm totally in LOVE with this pumpkin, I think she is the sweetest Halloween pumpkin EVER!!!!
Isn't she too cute?!!! I really LOVE her!!! Great job on this digi Cindy!!! I added some accent doodles to the image after I colored it with the Copics and then I also added some glossy accents to the eyes, nose and tooth. The black piece was cut from the Shall We Dance Cricut cartridge and I faux stitched around it with a white gel pen. The beautiful crinkle ribbon is by Patsy at The Prairie Bird Boutique. The darling green pattern on the green paper is an awesome background stamp by Market Street Stamps. It is called Punched Tin and I love how it looks on there. And last but not least the absolutely perfect sentiment for this cute pumpkin is from the All Around Halloween stamp set by My Creative Time.
Here is my second card using another digi by Cindy...
I think that kitty peeking out is just too darn cute!!!! For this one, I colored it with Copics and then cut it out. I printed a second copy on the blue background so I could glue my image down and still have the cute swirlies and such on the pumpkins and still have a dark starry sky. I added more doodling with my white gel pen and glossy accents on the cats eyes and nose. I used Emma's Stitched Oval Die and a sentiment from her Mixed Holiday Sentiments. A little bit of twine and inking and my card was done.
I hope you enjoyed these and thanks again Cindy. These were so much fun to work with!!!
Also make sure to join us for some sneak peeks with My Creative Time starting on Monday :)! Hugs- Glora
Items Used:
*Shall We Dance Cricut cartridge
*Cindy's Little Creations Digi Stamps
*My Creative Time stamps - All Around Halloween
*My Creative Time stamps - Mixed Holiday Sentiments
*My Creative Time Dies - Stitched Oval Die
*Market Street Stamps - Punched Tin
*Crinkle Ribbon from The Prairie Bird Boutique
*Twine from The Twinery
*Sakura White Gellyroll Pen
*Copics
*Glossy Accents
*Adhesive Rhinestones
Day 4 at Everyday Cricut
This was my final project on Everday Cricut. It was not supposed to post today, but it did - LOL. So if you haven't seen this fun double sided tri-fold card take a look and enjoy :).
A big hello to all of you wonderful Everyday Cricut Fans! This is Glora of Glora's Crafts, I can't believe how quickly my guest designer time has passed by. Today is my final day of guest designing for you and it has been amazing. I can not believe all the wonderful comments and support I have received. Thank you so much for the very warm welcome. Also thank you very much to Joy and Melanie for letting me share some projects with you.
Today, I started with a fairly simple scene card. I had it completely made and then I thought it would be awesome if it was a tri-fold card. Once I started to think about making it a tri-fold I couldn't get the idea out of my head until I did it. Has that ever happened to you? I hope you like it.
Here is the card all closed up:
This little scene reminds me of living in Utah. A beautifully starry sky, a full harvest moon and gorgeous mountains. If you open the front flap the card now looks like this:
Here are a couple of close-ups:
If I open the one last flap this is what you see:
Believe it or not, this card came completely from two cartridges, along with my Gypsy. All of the pieces (except for the little girl) came from the Pop Up Neighborhood Cricut cartridge. This cartridge is a Circle Member Exclusive cartridge, but I could not resist using it because of all of its beautiful backgrounds and images. The little girl is from the Playtime Cricut Lite cartridge. The girl normally has a dog on a leash, but I cut off the dog so she could be pulling her little pumpkin cart. The Playtime cartridge came with some Cricut Expression Machines that were sold at Walmart.
I know that both of these cartridges are not easily accessible to the average Cricut user, so before you throw rocks at me or something, I wanted to offer some suggestions on a few cartridges that would be good substitutes for making a card similar to this. The Sugar and Spice Cricut Lite cartridge has a cute wagon and a couple of little girls that you could have 'pulling' it. Nate's ABC's also has the little boy pulling a wagon. The Paper Doll cartridges with awesome backgrounds, a wagon and cute children to pull the wagons (both Paper Doll Dress Up and Everyday Paper Dolls). I hope this helps.
I figure what is the sense of making a card, if you can't write a personal note in it. The tri-fold is just something fun and interactive on the front of the card. This is a standard A2 sized card.
The beautiful sentiments and dies on this card are all by Emma at My Creative Time. They are from her sets called All Around Halloween and So Grateful For You. The dies are the Stitched Oval Die and the Fancy Frame and Stamp Die. The cute faces on the girls are by Peachy Keen Stamps. The one on the front is called Wide Eyed Kids and the one on the inside is called Happy Lashes.
I made a very short video for you showing how this card looks and opens up. Here it is:
If you really love tri-fold cards I have a couple of others on my blog that you can look at if you are interested. They are much simpler than this one, but they are kind of fun all the same. Click HERE for a Halloween tri-fold. Click HERE for a VERY simple Saint Patrick's Day tri-fold. And click HERE for a gingerbread tri-fold.
Card Recipe:
Pop Up Neighborhood Cricut cartridge
Playtime Cricut Lite cartridge
My Creative Time Stamps - All Around Halloween
My Creative Time Stamps - So Grateful for You
My Creative Time Dies - Fancy Frame Die and Stamp Set
My Creative Time Dies - Stitched Oval
Peachy Keen Stamps - Happy Lashes
Peachy Keen Stamps - Wide Eyed Kids
Paper is Core'dinations and BoBunny
Twine is from Trendy Twine
Subscribe to:
Posts (Atom)
>


