Wednesday, February 29, 2012

Happy Leap Day... I'm JUMPING FOR JOY!!!

Happy Leap Day 2012!!!! This is my first time blogging during a leap year, so I had to have a post go up today. I also have some fun PERSONAL news to share at the end of this post if you are interested. Anyway, I thought it would be fun to do a cute little frog card to represent LEAP DAY and my happy news too.


This is a shape card that I made using my Gypsy. I used the frog from the Paisley cartridge because it looks like he is ready to jump or leap. The lilly pad is from the Create-a-Critter cartridge. That super cute frog face is from a Peachy Keen Stamps set called Baby Animal Faces 3". And the awesome sentiment is from My Creative Time's Just a Little Note to Say. I think it is perfect for this card!

As for the PERSONAL news I wanted to share the reason why I'm 'jumping for joy'. I'm happy to finally share with all of you that my husband and I are going to be having a baby BOY! We have two very sweet girls and are very happy to be adding a little boy to our family at the beginning of the summer. YAY! We are SO super EXCITED (JUMPING FOR JOY)! I also want to share a link to the sweet card that my Crafting Bestie Pam sent to me when she learned of the happy news. Click HERE to see her card. She is quite the enabler because now I think that I NEED the cartridge she used for this card. If any of you know where I can find the 9 Months Cricut Lite cartridge for LESS than $40, will you PLEASE let me know. Have a terrific LEAP day and I hope you find something to JUMP for JOY about today! Huge Hugs- Glora

Items Used:

*Paisley Cricut Cartridge
*Create a Critter Cricut cartridge
*My Creative Time stamps - Just a Little Note to Say...
*Peachy Keen Stamps - Baby Animal Faces 3"
*Sakura White Gellyroll Pen
*Bic Sharpie Fine Point Pen
*Glossy Accents

Tuesday, February 28, 2012

D.H. Scrubby Tech Tip: The Life-Cycle of Windows

Glora's husband fancies himself a writer and a technology enthusiast (code for "likes expensive toys"). As a guest writer for Glora's Crafts, he writes articles which might be interesting to the crafting and blogging community.

In my day-job, I have found that many people do not know what version of Windows they use. If you are one of those people, don't worry. That is why you keep nerds like me around – to keep things running smoothly for you.

I also find that many people unknowingly run software that is past its "product life cycle." This means that they are no longer receiving security updates for the program – a very dangerous situation! Without patches and updates, your computer becomes more easily vulnerable to viruses, spam, or malware.

 Since 74% of visitors to this blog use a version of Windows, today I'll help you check your version, and learn what you can do if you are behind the times.

First, click the 'Start' button.

Find something that says "My Computer" or "Computer" and right-click it.
A menu will drop-down. From the bottom of that menu, select "Properties"

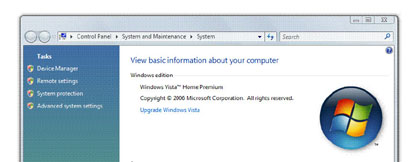
On the next window, you will see what version of Microsoft Windows you are running.

For many of you, it will look like one of these examples:

Now that you know what version you run, what should it mean to you? 

Windows 95, 98, 98se, ME, or 2000
These versions are very much out-of-date. You can unplug your computer from the Internet and safely use it off-line, but being connected is a dangerous proposition.
"Microsoft Windows XP" with no service pack "Microsoft Windows XP" and "Service Pack 1" "Microsoft Windows XP" and "Service Pack 2"
You are out of date, but a free upgrade exists. Upgrade to Service Pack 3. Click Start, All Programs, Accessories. Run the program "Windows Update" or "Microsoft Update." Follow the prompts. You may have to install some other updates in preparation for Service Pack 3, so be prepared to go back to the Windows Update site repeatedly until it offers no more updates.
"Microsoft Windows XP" and "Service Pack 3"
You are using a current version. Check Windows Updates periodically for new patches. However, you should remember this date: April 08, 2014! From now until then, you should start making some plans. After April 08, 2014, there will be no more updates offered for Windows XP. Ever. You can unplug your computer from the Internet and safely use it off-line, but being connected will become a dangerous proposition.
If your computer has enough horsepower to handle it, you could upgrade Windows to version 7 or 8 (expected to release at the end of 2012). However, this is a big deal – updating Windows usually means backing up your computer, deleting everything on the machine, installing the new version of the Windows operating system, and then spending days reinstalling all of the software that you use. Not to mention possibly needing to purchase a new printer, scanner, or other compatible accessories. My recommendation – save your pennies, and be ready to go computer shopping before April 8, 2014. After all, you'll need a newer, faster system by then anyway, right?!
"Microsoft Windows Vista" with no service pack "Microsoft Windows Vista" and "Service Pack 1"
You are out of date, but a free upgrade exists. Upgrade to Service Pack 2. Click Start, and type "Windows Update" into the search bar. Follow the prompts. You may have to install other updates in preparation for Service Pack 2, so be prepared to go back to the Windows Update program repeatedly until it offers no more updates.
"Microsoft Windows Vista" and "Service Pack 2" You are using a current version. No "end of life" date has been announced (although the date of 11 April 2017 has been tossed around as a possibility). Check Windows Updates periodically for new patches.
"Microsoft Windows 7"
You are out of date, but a free upgrade exists. Upgrade to Service Pack 1. Click Start, and type "Windows Update" into the search bar. Follow the prompts. You may have to install some other smaller updates in preparation for Service Pack 1, so be prepared to go back to the Windows Update program repeatedly until it offers no more updates.
"Microsoft Windows 7" and "Service Pack 1"
You are just fine. No "end of life" date has been announced. Check Windows Updates periodically for new patches.
All of this information is provided as a courtesy, and I am not responsible for changes, errors, omissions, or especially the policies of Microsoft!

For official information about Microsoft Product Lifecycles, please visit http://support.microsoft.com/gp/lifeselect
Comments are always welcome - however, please understand that I cannot provide technical support for your situation. If you run into trouble, seek out professional assistance (that is, invite the neighborhood nerd over and offer him a doughnut).

Monday, February 27, 2012

Cupid Brought Us Together...

I want to share one last Valentine card before February is over. I just finished this one up on Saturday so I will have to hold onto it until next year, but I HAD to make a card with this cute little cupid stamp I got from Peachy Keen Stamps. It is called Cupid's Sting.


I colored it with Copics, added gellyroll details and lots of glitter paint and stickles. I used a perfect sentiment from My Creative Time's You Had Me At Chocolate stamp set and I also used her Stitched Oval Die. I added a little bling and then I was done. Have a SUPER Monday! Hugs- Glora

Items Used:

My Creative Time stamps - You Had Me At Chocolate
My Creative Time Dies - Stitched Oval
Peachy Keen Stamps - Cupid's Sting
Copics
Stickles and shimmer paint
Gellyroll Pen
Adhesive Rhinestones

Saturday, February 25, 2012

Join in the PEACHY Fun this Weekend...

I hope you will come and join in the fun at the Peachy Keen Connection. There are two awesome challenges up and awesome prizes available for joining in the fun. Check out all the details at the top of the home page HERE.

I have a quick note card to share using some of the newly released stamps.


I used the March 2012 Stamp of the Month for the mushroom and its darling face. The cute mushroom background was made using the Mushroom Soup background stamp. Anyway, I hope to see you on the PKS Connection this weekend. We had lots of fun chatting this morning! Hugs- Glora

Items Used:

*Peachy Keen Stamps - March 2012 Stamp of the Month
*Peachy Keen Stamps - Mushroom Soup
*Copics
*Clear Embossing Powder
*Sakura Gellyroll Pen
*EK Success Paper Punch
*Chalk

Thursday, February 23, 2012

Peachy Keen Challenge #5

Today is the start of another Peachy Keen Challenge. We are making 3D projects that have to do with the weather (no cards and no layouts).

I made a sweet little spring gift box.


I used the Spring Holiday Cards Cricut cartridge for the box. I just made the box as large as I could on my Gypsy. It turned out to be a very nice size. The scallop and circle are from the Mini Monograms Cricut cartridge. And this adorable little spring chicken and umbrella are from a set called Shower Peepers. This is one of those darling stamp/ die combos that Peachy Keen Stamps and Cottage Cutz make together. This little chickie was just too cute not to make up for the weather theme. 

I tried something new for me, I cut everything on white cardstock and colored her with Copics and some chalk. My friends Lorie and Janice do this A LOT and I wanted to give it a try. I really love the extra depth and dimension it adds to the dies, I will definitely be trying this again.

I hope you will join in on this fun PKS challenge and I'm really looking forward to some of the sweet spring rain! Hugs- Glora

Items Used:

Spring Holiday Cards Cricut cartridge
Mini Monograms Cricut cartridge
Peachy Keen- CottageCutz - Shower Peepers
Copics
Chalks
Twine from The Twinery
Adhesive Pearls
Ribbon

Peachy Keen Stamps - March Stamp of the Month Sneak Peek

Hello sweet crafty friends. Today I have a project to share using the March 2012 Stamp of the Month stamp set by Peachy Keen Stamps. If you like gnomes you are going to LOVE this set. Oh and the add on sets, they coordinate beautifully and perfectly.

When I saw this sentiment I just had to make up this card for my husband. You see he never tells me what he wants for his birthday and when I ask him he will usually end up saying something like buy some more stamps for yourself or something (which I don't do, I ALWAYS find him something that he will enjoy, but he will love this card because of the inside joke). Anyway, here it is:


Anyway, how fun is that? The stump, door and windows, mushroom, sentiment and gnome girl are all on this awesome new set (plus LOTS of other stuff). Make sure to check out the Peachy Keen blog for more sneaks of these stamps! They will be available for purchase on Saturday at 8am EST. Until then we will have lots of fun sneaks for you to look at and enjoy on the PKS blog! Hugs- Glora

Items Used:

*Create a Critter Cricut cartridge (clouds only)
*Peachy Keen Stamps - March 2012 Stamp of the Month
*Tim Holtz Distress Ink
*SEI patterned paper (for dress)
*Sakura Gellyroll Pen

Wednesday, February 22, 2012

3D Wednesday with My Creative Time - St Patty's Day Treats

Hello and welcome to another 3D Wednesday at My Creative Time

For my project today I made little St Patty Day treat holders. My mother-in-law had brought my girls the cutest Valentine treats in containers just like this (except with a heart cut out and they were pink and red but you get the idea - the STYLE was the same). Anyway, after my girls had taken the candy out I opened it up and saw how easy it would be to replicate in my Gypsy and so I did. 


All it took was a rectangle from Plantin' Schoolbook (3" by 8") welded to a scallop edge from Plantin' Schoolbook (3" wide). Then I added a shamrock from the Designer's Calendar cartridge (add it upside down because when you assemble it will end up right side up). I cut it out and then I scored it a 3.25", 4.75" and 8" and voila, I was done with the basic container.


After cutting and scoring I decided to clear emboss the front with the cute Lucky Day Shamrock background stamp by Peachy Keen Stamps and I added a fun sentiment from Emma's darling I Believe in Leprechaun's stamp set.  I REALLY love these two sentiments I used because they are PERFECT to use ANY time of the year.


For the candy I put it in a tiny treat bag and stapled it in place. Then I added the white scallop piece to cover the staple and a little bit of twine and I was done. Easy but cute. I hope you enjoyed these. I can't wait to see what Emma and the rest of the design team have in store for us! Hugs- Glora

Items Used:

Plantin' Schoolbook Cricut cartridge
Designer's Calendar Cricut cartridge
My Creative Time stamps - I Believe in Leprechaun's
Peachy Keen Stamps - Lucky Day Shamrock
Clear Embossing Powder
Twine from The Twinery

Monday, February 20, 2012

You're Egg-straordinary!

Hi, I have a super quick card to share with you today. It is a little 3.5 x 3.5" note card that I made using one of Emma's newest release stamps sets Happy Hunting


I tried a new technique (for me) on the background. You ink the background up with Tim Holtz distress ink and then you spray your stamp with glimmer mist and stamp it. For the background stamp I used Emma's pretty floral background stamp from the Spring Chicken Background stamp set. This gives a really cool effect in person. The inner part has the exact impression of the background stamp and then it gives a glittery outline to everything. I just wish it showed up better on this picture. Oh and I also stamped and colored my bunny on PaperTrey Ink Kraft cardstock.

Well that's it for today. I hope you have a TERRIFIC day! Hugs- Glora

Items Used:

My Creative Time stamps - Happy Hunting
My Creative Time stamps - Spring Chicken Background
My Creative Time Die - Stitched Oval
Twine from The Twinery
Cardstock from PaperTrey Ink
Tim Holtz Distress Ink
Glimmer Mist
Copics

Thursday, February 16, 2012

MCT February Release Blog Hop

Hi and welcome to the My Creative Time February Stamp Release Blog Hop. If you came here from Cindy's blog you are in the right spot, if not make sure to start back at Emma's blog so you can get the whole hop in.

Today I am using the new Happy Hunting stamp set. I used both of the darling bunny images on there to make a small Easter banner. Here is what the banner looks like hanging up:


Here is a closeup of one of the letters and one of the darling bunnies, I used Emma's XL Label Die for the banner pieces and the XL Label Border stamps for the stitching on the banner pieces:


And here is a closeup of the other bunny:


Here you can see this whole set. Isn't it ADORABLE?!


***HUGE GIVEWAY ALERT***
For our giveway today, we are  giving ONE LUCKY winner a $100 Gift Certificate to "My Creative Time's" new online store!  All you have to do is leave a comment here along w/the rest of the design team's blogs AND also leave a way for me to contact you! Each designer will be picking a winner, then Emma will use random.org to pick the lucky winner out of those 19 names! So remember you  have "19" chances to win! All you have to do is leave a comment on all blogs in this hop for more chances to win! The deadline is Sunday, Feb 19th at midnight! EASY PEASY!!! GOOD LUCK!:)

Your next stop is the SUPER talented Jeanne! Click HERE to go to her blog.

And here is the blog line up just in case you get lost along the way:


Happy hopping and have a wonderful day! Hugs- Glora

Items Used:

*Alphalicious Cricut cartridge
*My Creative Time stamps - Happy Hunting
*My Creative Time stamps - XL Label Borders
*My Creative Time Dies - XL Label 
*Copics
*Glossy Accents
*Twine from The Twinery
*Stickles

Wednesday, February 15, 2012

MCT February Release Sneak Peek Day #3

Happy Wednesday and welcome to day 3 of sneak peeks of the February stamp release over at My Creative Time. Aren't you loving these sets so far? They are ADORABLE! I'm totally in love with every single stamp, I think Emma REALLY outdid herself this time.

Today, I think you will see some pretty classy and beautiful projects, mine however, is a little on the fun side of things. I saw these darling egg dies that come with this Hello Spring set and my mind starting thinking of all sorts of possibilities with them. They are going to be USED a lot this year I'm certain. One of the fun and crazy ideas was to make some little 'EGG' people and so here is my egg people card.


I know they are silly, but I LOVE them! I can't help it they make me SMILE. The beautiful stitched egg is the die that comes with the Hello Spring set and the darling flower and swirl patterns on the eggs are stamps that come with this set and coordinate perfectly with this die. The perfect sentiment for my egg card is from the Happy Hunting stamp set that we showcased on Monday. I stamped the sentiment onto Emma's Stitched Oval Die. The cute hands and legs for these eggs come from the February 2012 Stamp of the Month by Peachy Keen Stamps and the faces are also by Peachy Keen Stamps - Simple Simons and Simple Sallies. I cut the grass from Everyday Paper Dolls and the clouds from Create a Critter.

Sneak Peek Giveaway Time!
With all of our Sneak Peek weeks, Emma likes to do some FUN giveaways!
 ***All you have to do is leave comments on our blogs! You do NOT have to comment on every blog, BUT if you do, you will just have more chances to win!
 ***SPREAD THE WORD TO THE WORLD ON FACEBOOK about this release & whatever connections you may have! Let us know on "My Creative Time's" FB page here http://www.facebook.com/#!/pages/My-Creative-Time/364568506334 that you did so! OR you can just tag Emma in your post!
 Emma will randomly pick & announce all winners on Thursday, Feb 16th during this AWESOME release happening @ 12:01am PST in her video! GOOD LUCK!
 Log onto to your facebook now & let start spreading word!;)

Alright, now make sure to check out Emma's blog if you haven't already, I'm certain you won't want to miss all the beautiful samples by her and the design team. I will see you all tomorrow for the blog hop :). Hugs- Glora

Items Used:

*Create a Critter Cricut cartridge
*Everyday Paper Dolls Cricut cartridge
*My Creative Time stamps - Hello Spring
*My Creative Time stamps - Happy Hunting
*My Creative Time Dies - Stitched Oval
*Peachy Keen Stamps - Simple Simons
*Peachy Keen Stamps - Simple Sallies
*Peachy Keen Stamps - February 2012 SOTM
*Twine from Trendy Twine
*Ink for inking
*Chalk
*Glossy Accents

Tuesday, February 14, 2012

MCT February Release Sneak Peek Day #2

Hi and welcome to day 2 of sneak peeks from My Creative Time's newest stamp release. Today we are showcasing a couple of background stamps called Spring Chicken. These are darling. The background that I used is really chicken wire but I thought it also looked a lot like honeycomb so I made a 3.25" note card using the chicken wire/honeycomb background.


To get the pretty glossy (honey) finish on the background stamp I inked it with watermark ink and then I heat embossed it with clear embossing powder. I ALWAYS love how clear embossing powder looks on a background stamp! The sweet little sentiment and tag are from Emma's January release and are called Teeny Tag Greetings. The cute little bee is from Create a Critter and stamped with the Snow Cuties face by Peachy Keen Stamps.


Sneak Peek Giveaway Time!
With all of our Sneak Peek weeks, Emma likes to do some FUN giveaways!
 ***All you have to do is leave comments on our blogs! You do NOT have to comment on every blog, BUT if you do, you will just have more chances to win!
 ***SPREAD THE WORD TO THE WORLD ON FACEBOOK about this release & whatever connections you may have! Let us know on "My Creative Time's" FB page here http://www.facebook.com/#!/pages/My-Creative-Time/364568506334 that you did so! OR you can just tag Emma in your post!
 Emma will randomly pick & announce all winners on Thursday, Feb 16th during this AWESOME release happening @ 12:01am PST in her video! GOOD LUCK!
 Log onto to your facebook now & let start spreading word!;)


Make sure to stop by Emma's blog and see what everyone has made with these beautiful background stamps! Hugs- Glora

Items Used:

*Create a Critter Cricut cartridge
*My Creative Time stamps - Spring Chicken
*My Creative Time stamps - Teeny Tag Greetings
*Peachy Keen Stamps - Snow Cuties
*Tim Holtz Distress Ink
*Clear Embossing Powder
*Sakura White Gellyroll pen
*Twine from The Twinery
*Crystal Stickles
*Chalk

Monday, February 13, 2012

MCT February Release Sneak Peek Day #1

Hello My Creative Time friends. Today Emma and some of the design team members are showing sneak peeks at a darling set called Happy Hunting. This set has some darling images and sentiments. I had a lot of fun making a coordinating card and envelope, a sweet crafting friend of mine, Crafts Manda from AT Home Ink always makes coordinating cards and envelopes so this project is very much inspired by her. Anyway, I hope you like it.


The card is approximately 4x4" and I wanted it to look like it matched/coordinated with the little one that fits on the Scallop and Stitched Circle Dies. So yes, this Happy Hunting stamp set comes with the darling little bunny and round sentiment that fits on the Scallop and Stitched Circle Die and it also comes with this adorable matching and larger sized bunny, plus some bigger sentiments and such as well. Isn't this bunny a cutie? The sentiment is normally straight but I just curved the sentiment on my stamping block to make it go around in a circle.

Sneak Peek Giveaway Time!
With all of our Sneak Peek weeks, Emma likes to do some FUN giveaways!
 ***All you have to do is leave comments on our blogs! You do NOT have to comment on every blog, BUT if you do, you will just have more chances to win!
 ***SPREAD THE WORD TO THE WORLD ON FACEBOOK about this release & whatever connections you may have! Let us know on "My Creative Time's" FB page here http://www.facebook.com/#!/pages/My-Creative-Time/364568506334 that you did so! OR you can just tag Emma in your post!
 Emma will randomly pick & announce all winners on Thursday, Feb 16th during this AWESOME release happening @ 12:01am PST in her video! GOOD LUCK!

If you haven't already, I hope you will hop on over and see what Emma and the rest of the design team dreamed up with this darling Easter set! Have a great one! Hugs- Glora

Items Used:

Mini Monograms Cricut cartridge (scallop and circle)
Paper Pups Cricut cartridge (envelope)
My Creative Time stamps - Happy Hunting
My Creative Time Dies - Scallop and Stitched Circle Die
Copics
Ink for inking
Adhesive Rhinestones
Sakura White Gellyroll Pen

Thursday, February 9, 2012

Throwback Thursday - BUG Challenge

Hello and welcome to another Throwback Thursday Challenge for My Creative Time. For this Throwback Thursday Challenge we were to use a "bug" of any sort off of any older Cricut cartridge. There are TONS of possibilities so I can't wait to see what everyone comes up with.

I decided to make a bright and colorful friendship card.


This really pretty butterfly is from the Once Upon a Princess Cricut cartridge. The only drawback was that even cutting it at 3 1/2 inches it was still too small to add a cute little Peachy Keen face too (even the smallest ones were just too big). I made the shape of this card using my Gypsy and a pretty shape from the Lacy Labels Cricut Lite cartridge. All the paper is from a SEI paper pad. And thanks to a reminder from my sweet friend Cindy of Cindy's Scraptastic Designs I added twine around my card. I haven't done that in several months and I had forgotten how pretty it looked until I saw THIS darling card that she made. And of course, that BEAUTIFUL and perfect friendship sentiment is from Emma's Many Greetings stamp set. Isn't that sentiment PERFECT? I had totally forgot that it was even on this set. I'm so glad that I looked at the sentiments on there again, this is definitely a terrific year round - all occasion sort of stamp set. I LOVE it!

I hope you will join in the fun and since this is the last Throwback Thursday before Emma's next stamp release you will definitely want to join in the fun so you have a chance for the AWESOME prize.

I hope you will drop by Emma's blog if you haven't already to see what she and some of the other design team members have ready for you. Have a WONDERFUL day! Hugs- Glora

Items Used:

*Once Upon a Princess Cricut cartridge
*Lacy Labels Cricut Lite cartridge
*My Creative Time stamps - Many Greetings
*SEI paper
*Twine from The Twinery
*Sakura Gellyroll Pen
*Tim Holtz Distress Ink

Saturday, February 4, 2012

Just For Fun...

Hi everyone, I just wanted to share real quick my daughter's birthday cake. Now I know it isn't a masterpiece. But it was really fun to make and she LOVED it! Of course she is completely in love with elephants so I knew it would be a hit.


This was not an original creation either. My Mom has an old book of different shaped cakes made from regular cake pans. For example this cake was made with two circle cakes. The one circle is the body and the other one was cut into pieces to make up the head, trunk and feet. Her book also tells you to use a whipped cream type frosting (this is so that the cut cake pieces won't stick to the frosting while you are frosting it) and then you just top it with food colored coconut flakes. Next you decorate it with whichever candy you think will look best. We used pull and peel licorice for the bow and tail, a cashew for the little tusk, A Whopper for the eye, M&M's for the toe nails and a great BIG yummy solid chocolate Valentine's day heart for the ear.

Well I hope you all have a super weekend! Take care! Hugs- Glora

Thursday, February 2, 2012

Peachy Keen Challenge using Toilet Paper Rolls

Hello friends, today is the start of another Peachy Keen Challenge.

Here is the CHALLENGE
This is another fun idea from Raven! Create ANY project of your choice using an empty toilet paper roll. Need ideas? Take a peek at the designer's inspiration over on the challenge blog HERE! 
They will be awarding "TOP PEACH" to the player who uses their Peachy Keen Stamps this week and our two runner ups will receive a spiffy badge to display on their blog!
Guidelines:
  • Design must be new
  • Link up by 2/8 - 11:59 pm CDT

Show us what you can do with an empty toilet paper roll!

Here is what I made with 3 toilet paper rolls:


This was not my original idea so I don't want to take credit for it. I was looking on Google to get ideas for using toilet paper rolls and saw that someone had made these simple little flowers of them. I imagined them with darling little Peachy Keen Faces and knew that was what I had to make. I also have seen a good crafty friend of mine, Cassandra, make LOTS of beautiful centerpieces and so she was the inspiration behind finding a cute container and foam to put these toilet paper roll flowers in. Since making this particular project Cassandra also has made a DARLING Peachy Keen flower arrangement (using 3 flowers and 2 of the same faces I had - I could hardly believe). Hers is way CUTER so you will definitely want to check it out HERE.


Now onto the details of how to make these flowers if you are interested.

Take you empty toilet paper roll and cut small slits in it going almost to the middle and all the way around the toilet paper roll, then turn to the other side and do the same thing. You will want to leave about a 1/4" in the middle so you can put a pick, pen or pencil through them. Your toilet paper roll should look like this:


Next, you will want to fan out your pieces pressing them in towards the center to get your fun flower shape. You will also want to paint them. For mine I painted them with red paint and then I sprayed them with glimmer mist.

While the flowers were drying I worked on the face part of the flowers. I cut circles out at 2" and then I stamped them with some of my favorite Peachy Keen Stamps. For each of these I used the biggest face in the assortment packs. I used the following sets: Winter Wonderland, Happy Lashes and Snow Cuties. I also added chalk for the cheeks, colored in the mouths and dotted around the edges.

Once the flowers were dry I punched a hole in the middle and added pencils. I wrapped the pencils in green pipe cleaners and added a pipe cleaner leaf. Next I glued the circle faces to the front and plain circles to the back so that both sides look nice. I arranged them in a block of floral foam which I placed in a felt basket and then added some paper flowers in to cover the floral foam. I think I need to add a pretty ribbon to the front and I will probably change out the filler but other than that I'm super HAPPY to have these bright and happy flowers smiling at me each day.

I hope you will join in this fun challenge. I can't wait to see what you all come up with :). Make sure to drop over to the PKS challenge blog to see the awesome inspiration that the designers have for you. And have a wonderful day! Hugs- Glora

Items Used:

Peachy Keen Stamps - Winter Wonderland
Peachy Keen Stamps - Happy Lashes
Peachy Keen Stamps - Snow Cuties
Toilet Paper Rolls
Floral Foam
Felt Basket
Green pipe cleaners
Chalk
Red paint
Glimmer Mist

My Favorite Stamp of the Month - FEBRUARY - at My Creative Time

Hello sweet friends. I just wanted to let you know that the My Favorite Stamp of the Month over at My Creative Time is... I Believe in Leprechauns. It is such a cute set and it will be on sale until Friday at 12:01AM PST.

I also have to give a shout out to my sweet friend Kim who is guest designing at My Creative Time today. Click HERE to go to her post at My Creative Time and HERE to go and check out her awesome blog. Believe me you will DEFINITELY want to stop by and see the beautiful projects she has created using the I Believe in Leprechauns stamp set.

I don't have a new project for you but I wanted to share some of the projects that I have made with this stamp set in the past. I will include links to their original posts too just in case you are interested in more details on the products I used on them...

This is a spinner card and changes faces. To see the original post click HERE.


Some of these sentiments are perfect to use all year long like this dance card I made for my daughter's dance teacher. The original post is HERE.

Here is my Have a Sham-rockin' Day card. The shamrock is on an Action Wobble. Click HERE for the original post.

Here is my Happy St. Pats Day card. Click HERE for the original post.

Have a super LUCKY day! Hugs- Glora

Wednesday, February 1, 2012

Simply Crafts Challenge for February

Hi and welcome to another Simply Crafts Challenge. It is the first Wednesday of the month so my crafting bestie Pam and I do a cut challenge and now you can join in the fun too. Just join us HERE at the Simply Crafts Challenge Blog for more details.

This month Pam chose the cut and it is the tree from the Sweethearts Cricut cartridge. I decided to make a shaped card for my sweet Valentine.


I changed the tree just a little. I added hearts instead of using the leaves that come with the cut. I gave the tree a woodgrain texture with a background stamp by Market Street Stamps called Woodgrain. The beautiful 'Be Mine' sentiment is from Emma's new set called Teeny Tag Greetings. I LOVE this darling set. The hearts have glossy accents on them to give some extra dimension and the edges were all inked with Tim Holtz Distress Ink.

You will DEFINITELY need to see what Pam made! I'm totally in LOVE with the darling little scene she made. It is SO clever and ADORABLE. Click HERE to go to her blog.

And yes, there is a prize. Some Peachy Keen Stamps! In fact the exact set you see below:
Aren't these the cutest?! I absolutely LOVE these faces!!!! So what are you waiting for? Hop on over to Simply Crafts and join in the fun! Have a great day! Hugs- Glora

Items Used:

Sweetheart Cricut cartridge
My Creative Time stamps - Teeny Tag Greetings
Market Street Stamps - Woodgrain
Tim Holtz Distress Ink
Glossy Accents
Twine from Trendy Twine
>